
Wistia is a great video-hosting platform founded in 2008, which was created to make video marketing easier for online businesses. One of the features of Wistia is, what they call Turnstile, to let video owner's to collect their email address and their name.
However, if you'd like to capture more than just a name and email address, Turnstile doesn't support this. That's where Getform comes in to cover. Using Getform, you can capture whatever information is suitable for your Wistia video and customize it as you wish!
In this blog post we will show you how to create a custom Wistia form and manage your form backend with Getform.
How to make a Wistia form using Getform
Adding a custom form to your Wistia video is pretty simple. Let's imagine a scenario you have a video about a programming tutorial and you want to capture the email address, name and their favourite software development platform of everyone who views one of your videos. Here's the process:
1- Create a Getform account and generate your unique form endpoint
- Create an account on Getform. Signup is dead easy. You can get started without providing any credit card info. The link above will open in a new tab so you can continue following these directions.
- Create your form on Getform. Immediately after you sign up, you will see the “+” button on your dashboard to create a new form, let's name it as “Wistia Developer Video - Form” and save it. create your first form. With that form created, your unique form endpoint will be ready to be inserted to your form HTML.
2- Prepare your form HTML for your Wistia video
Add the needed fields to complete your form, don't miss out the name="" attributes and paste the form endpoint URL you got in Step 1 to action="" attribute of the form tag.
After some styling, your form HTML should look like the following:
<form accept-charset="UTF-8" action="https://getform.io/f/your-unique-form-endpoint" method="POST">
  <input type="hidden" name="utf8" value="✓"> //optional

  <input type="text" name="name" placeholder="Your name"
  style="height: 60px; line-height: 36px; font-size: 24px; font-family:
  WistiaOpenSans, Helvetica, Arial, sans-serif; padding-right: 12px; border-radius: 5px;
  padding-left: 12px; width: 500px; margin-top: px;">
  <br />
  <input type="text" name="email address" placeholder="Your email address"
  style="height: 60px; line-height: 36px; font-size: 24px; font-family:
  WistiaOpenSans, Helvetica, Arial, sans-serif; padding-right: 12px; border-radius: 5px;
  padding-left: 12px; width: 500px; margin-top: 5px;">
  <br />

  <select style="height: 60px; line-height: 36px; font-size: 24px; font-family:
  WistiaOpenSans, Helvetica, Arial, sans-serif; padding-right: 12px; border-radius: 5px;
  padding-left: 12px; width: 520px; color: #707070"
  name="platform" required="required">
    <option default>Select Your Platform</option>
    <option>Github</option>
    <option>Gitlab</option>
    <option>Bitbucket</option>
  </select>

  <br />
  <button type="submit" style="margin-top: 30px;
  background-color:  #6B7DDF; color: rgb(255, 255, 255); font-family:
  WistiaOpenSans, Helvetica, Arial, sans-serif; font-size: 24px; border-radius:
  0px; font-weight: 600; border-style: none; height: 50px; border-radius: 5px; width:
  130px;">SUBMIT</button>
</form>
- Copy the HTML to use it in the next steps.
3- Add a call to action to your Wistia video
Third step is to add a Call to Action on your Wistia video.
- Login to your Wistia account,
- Open the video you want to add a form and click Customize from the left navigation bar.
- Then, click "Call to Action"
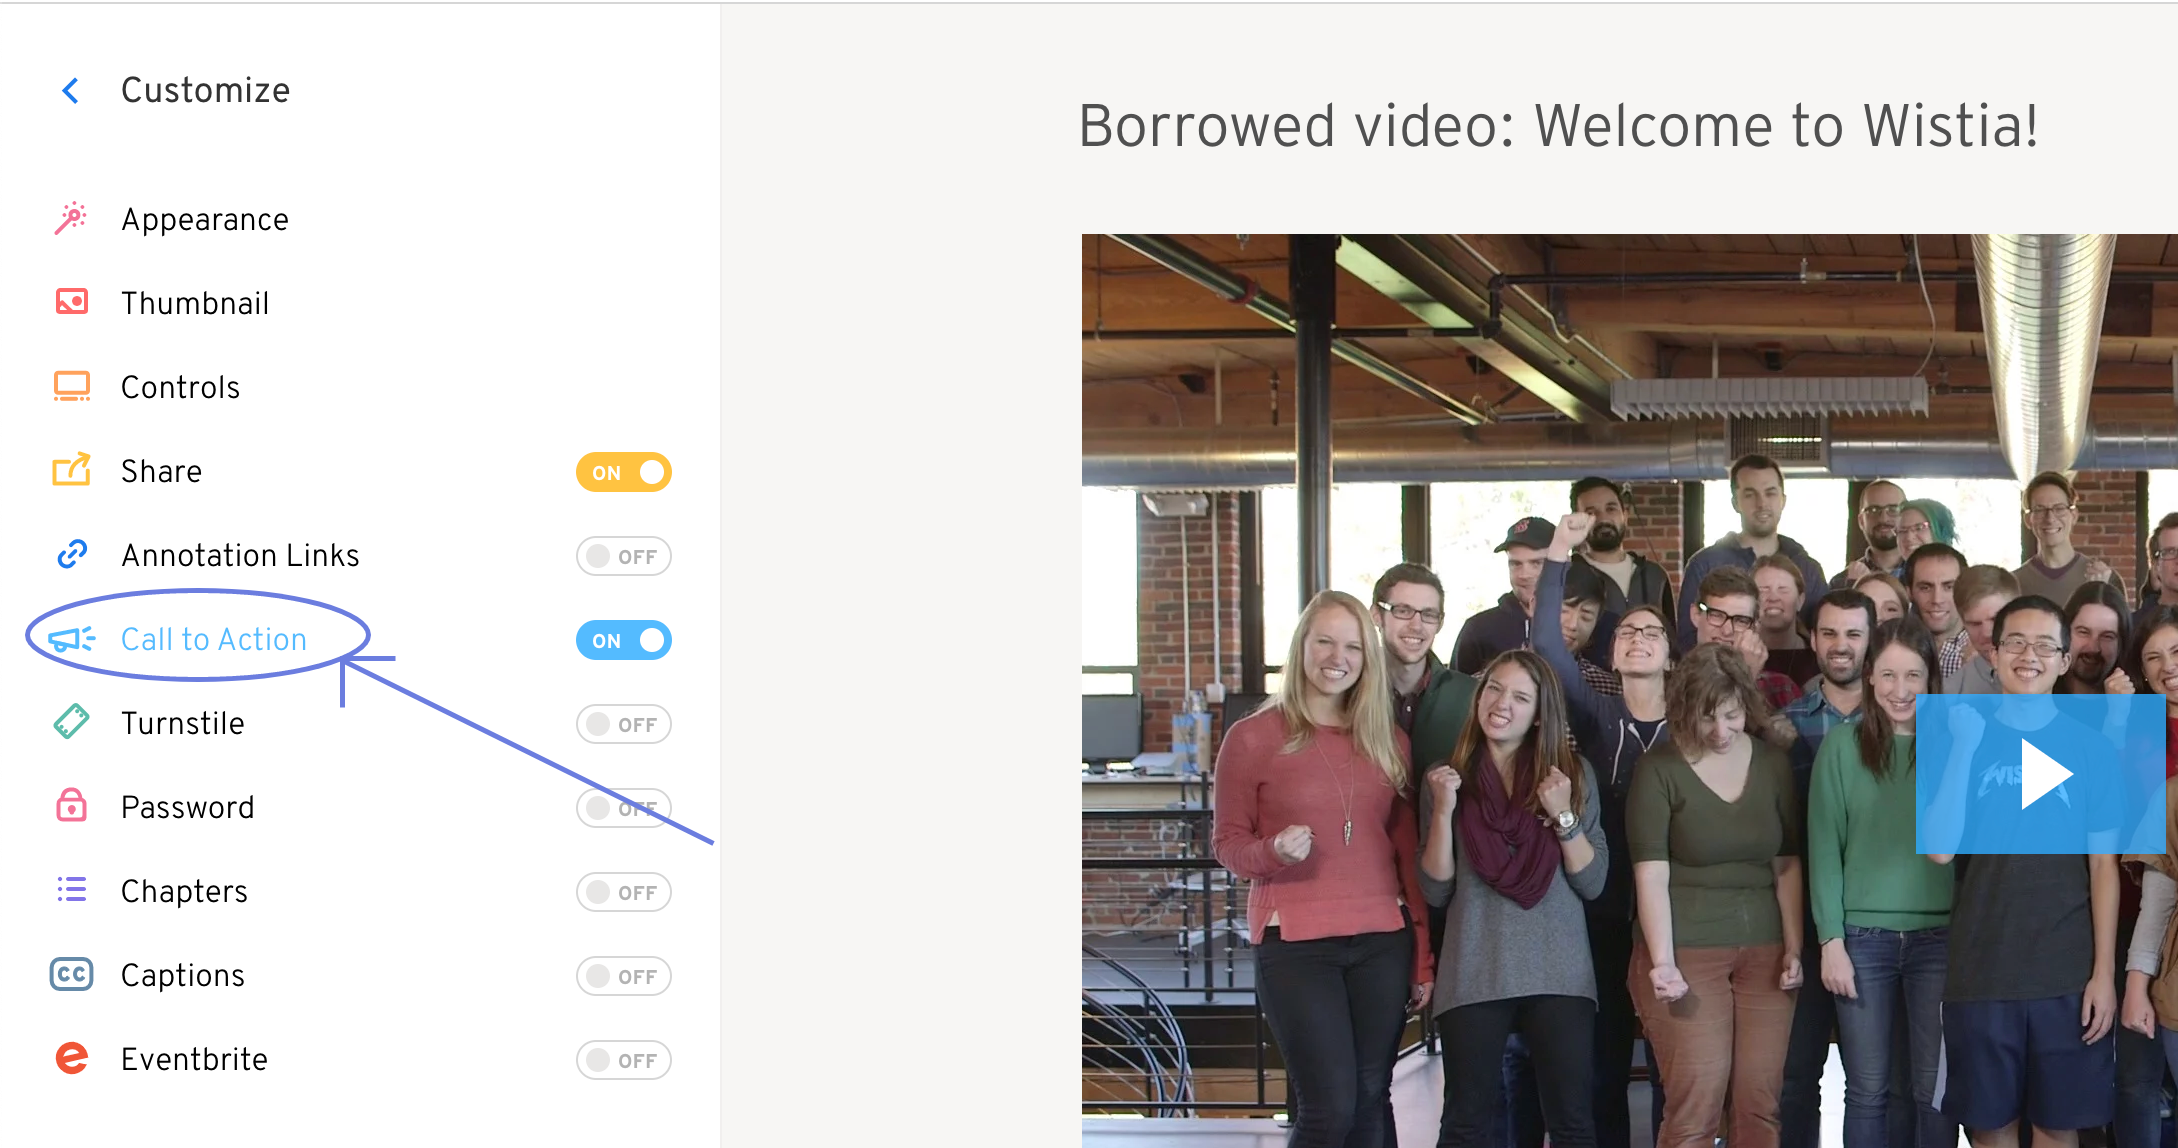
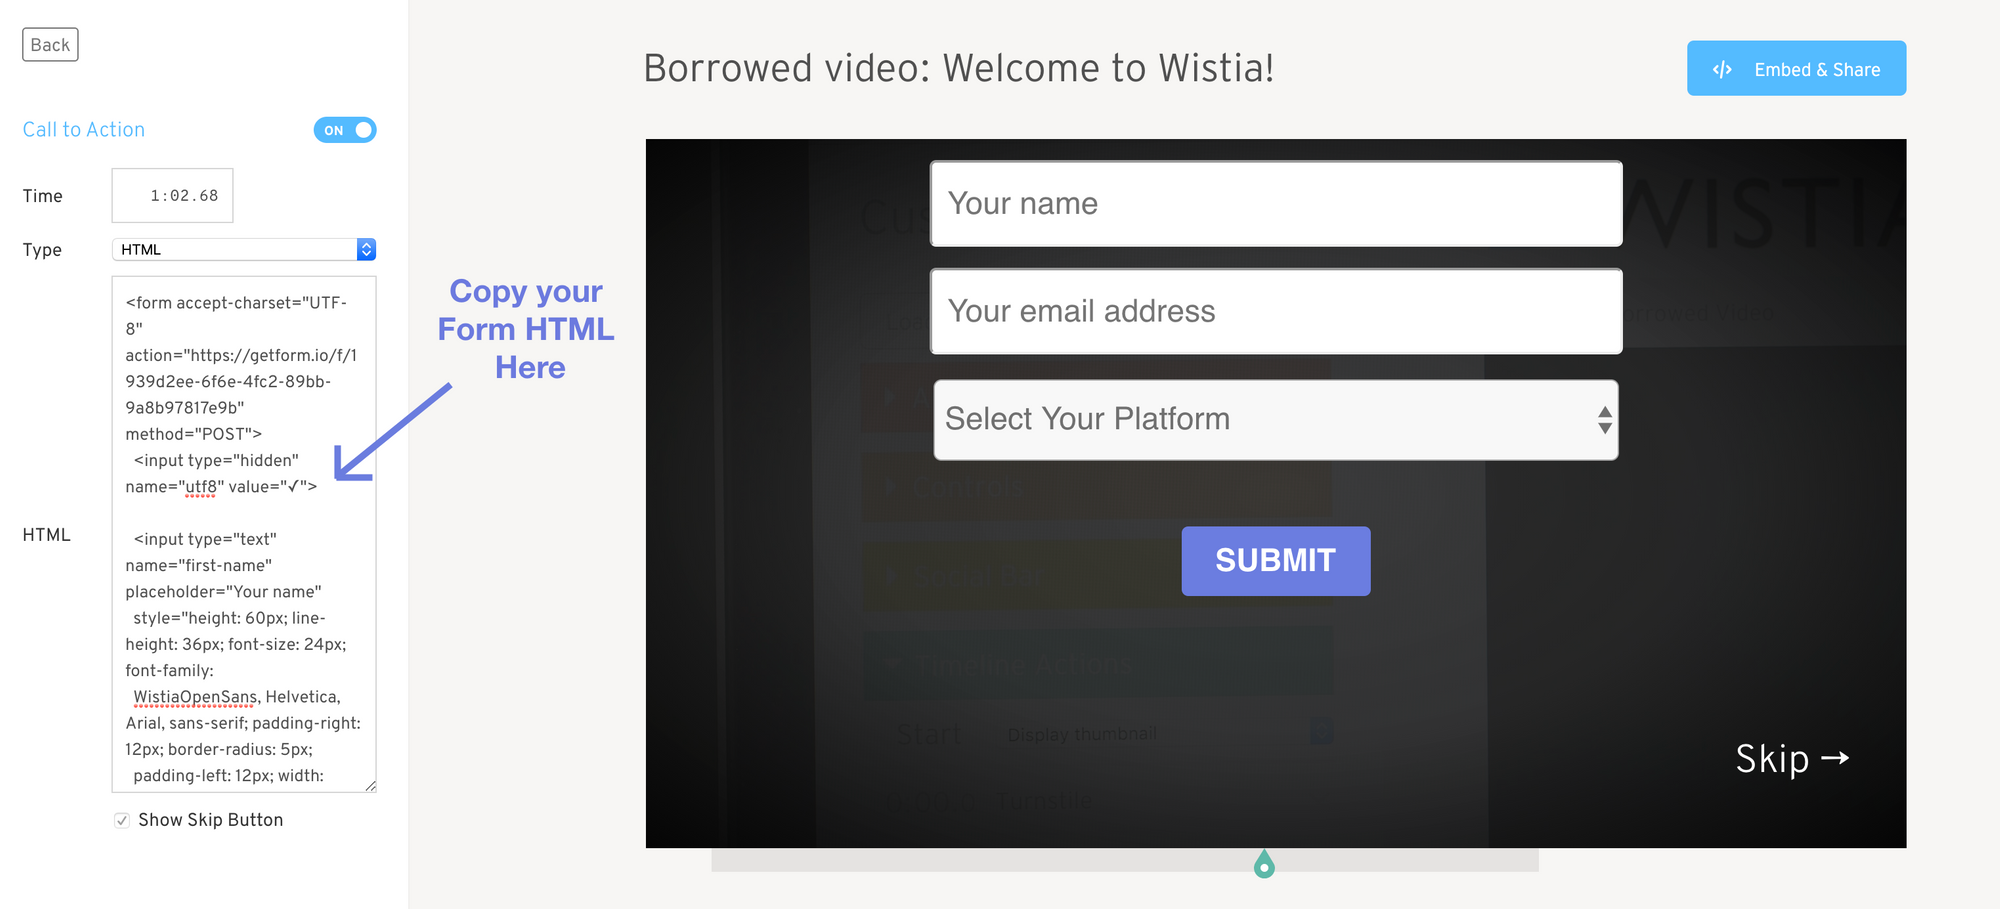
- Select HTML from the Type dropdown.
- Copy the form HTML you have created in Step 2 and paste it to text field shown on the left side of your Wistia video dashboard.
Your screen should look something like this:
4 - Check out your Wistia form and test it by sending a submission
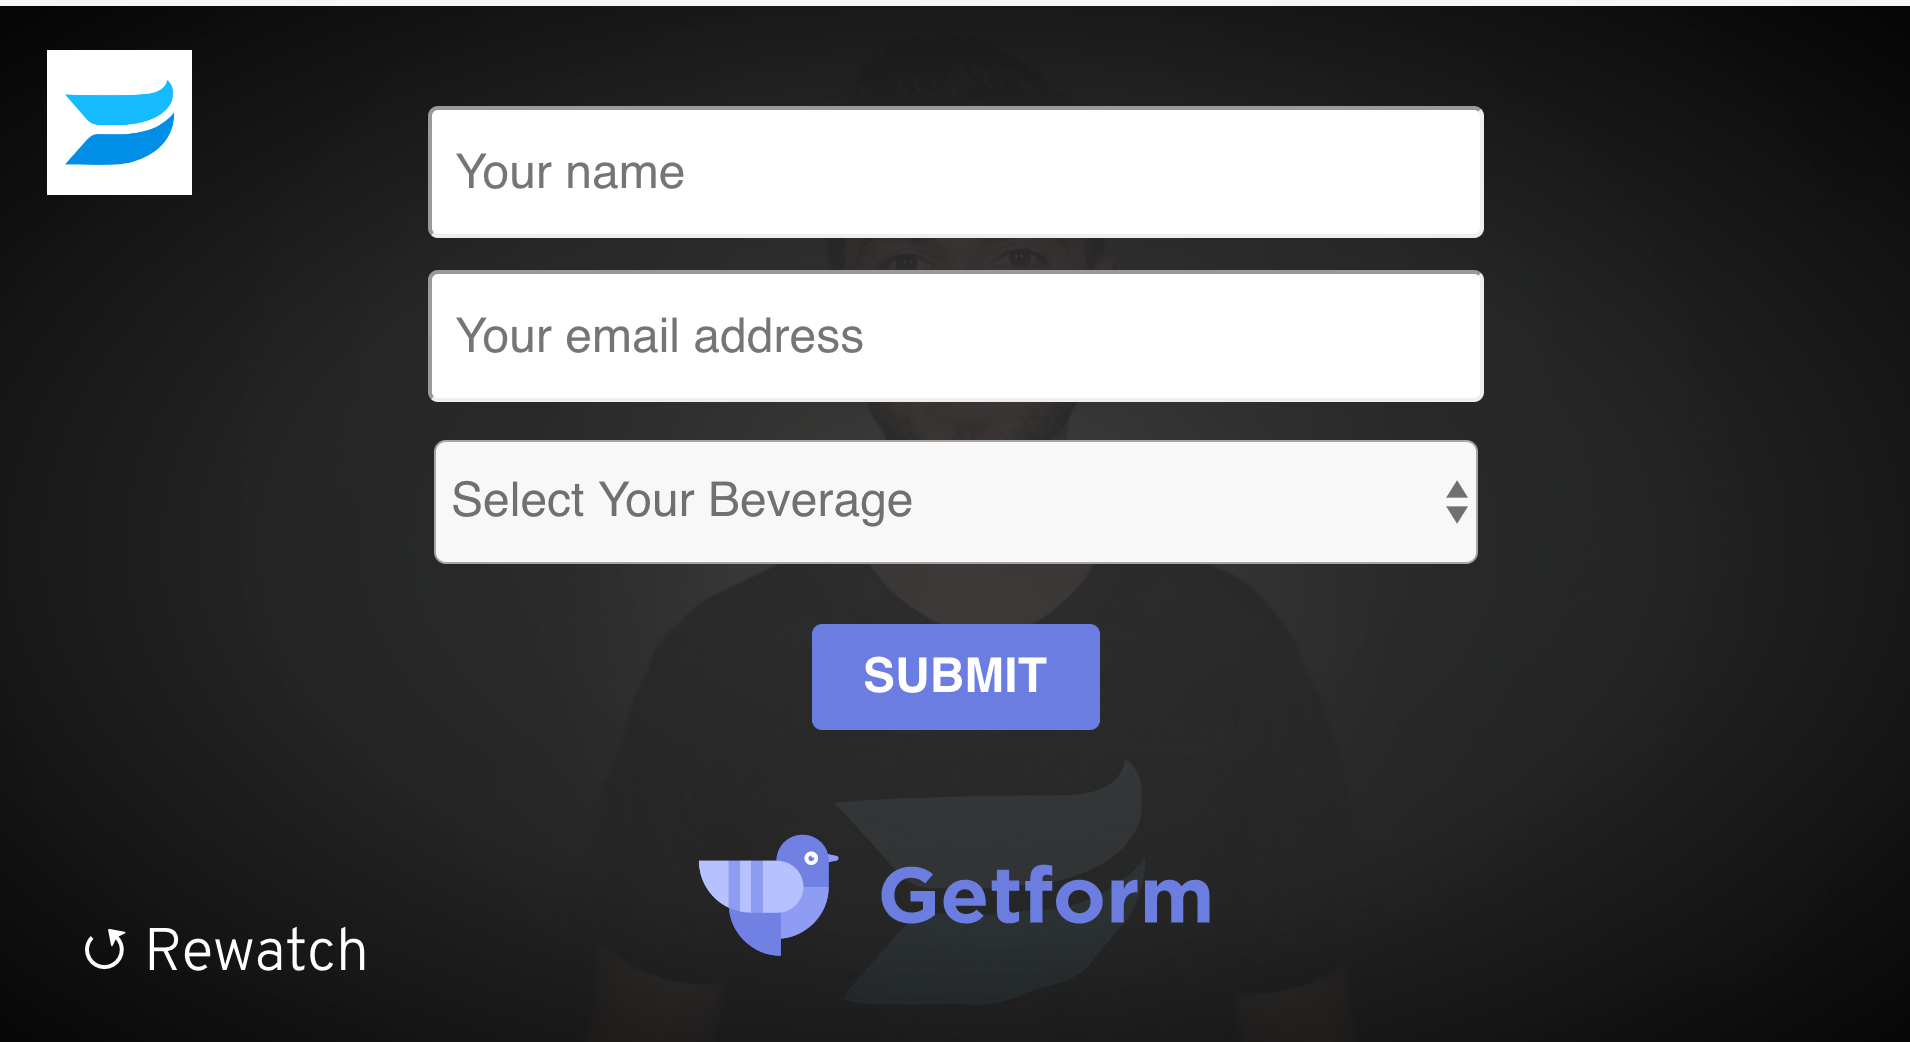
As soon as you paste the code and click "Save", your video now has a custom form asking for name, email and favourite software platform . Just what we wanted!
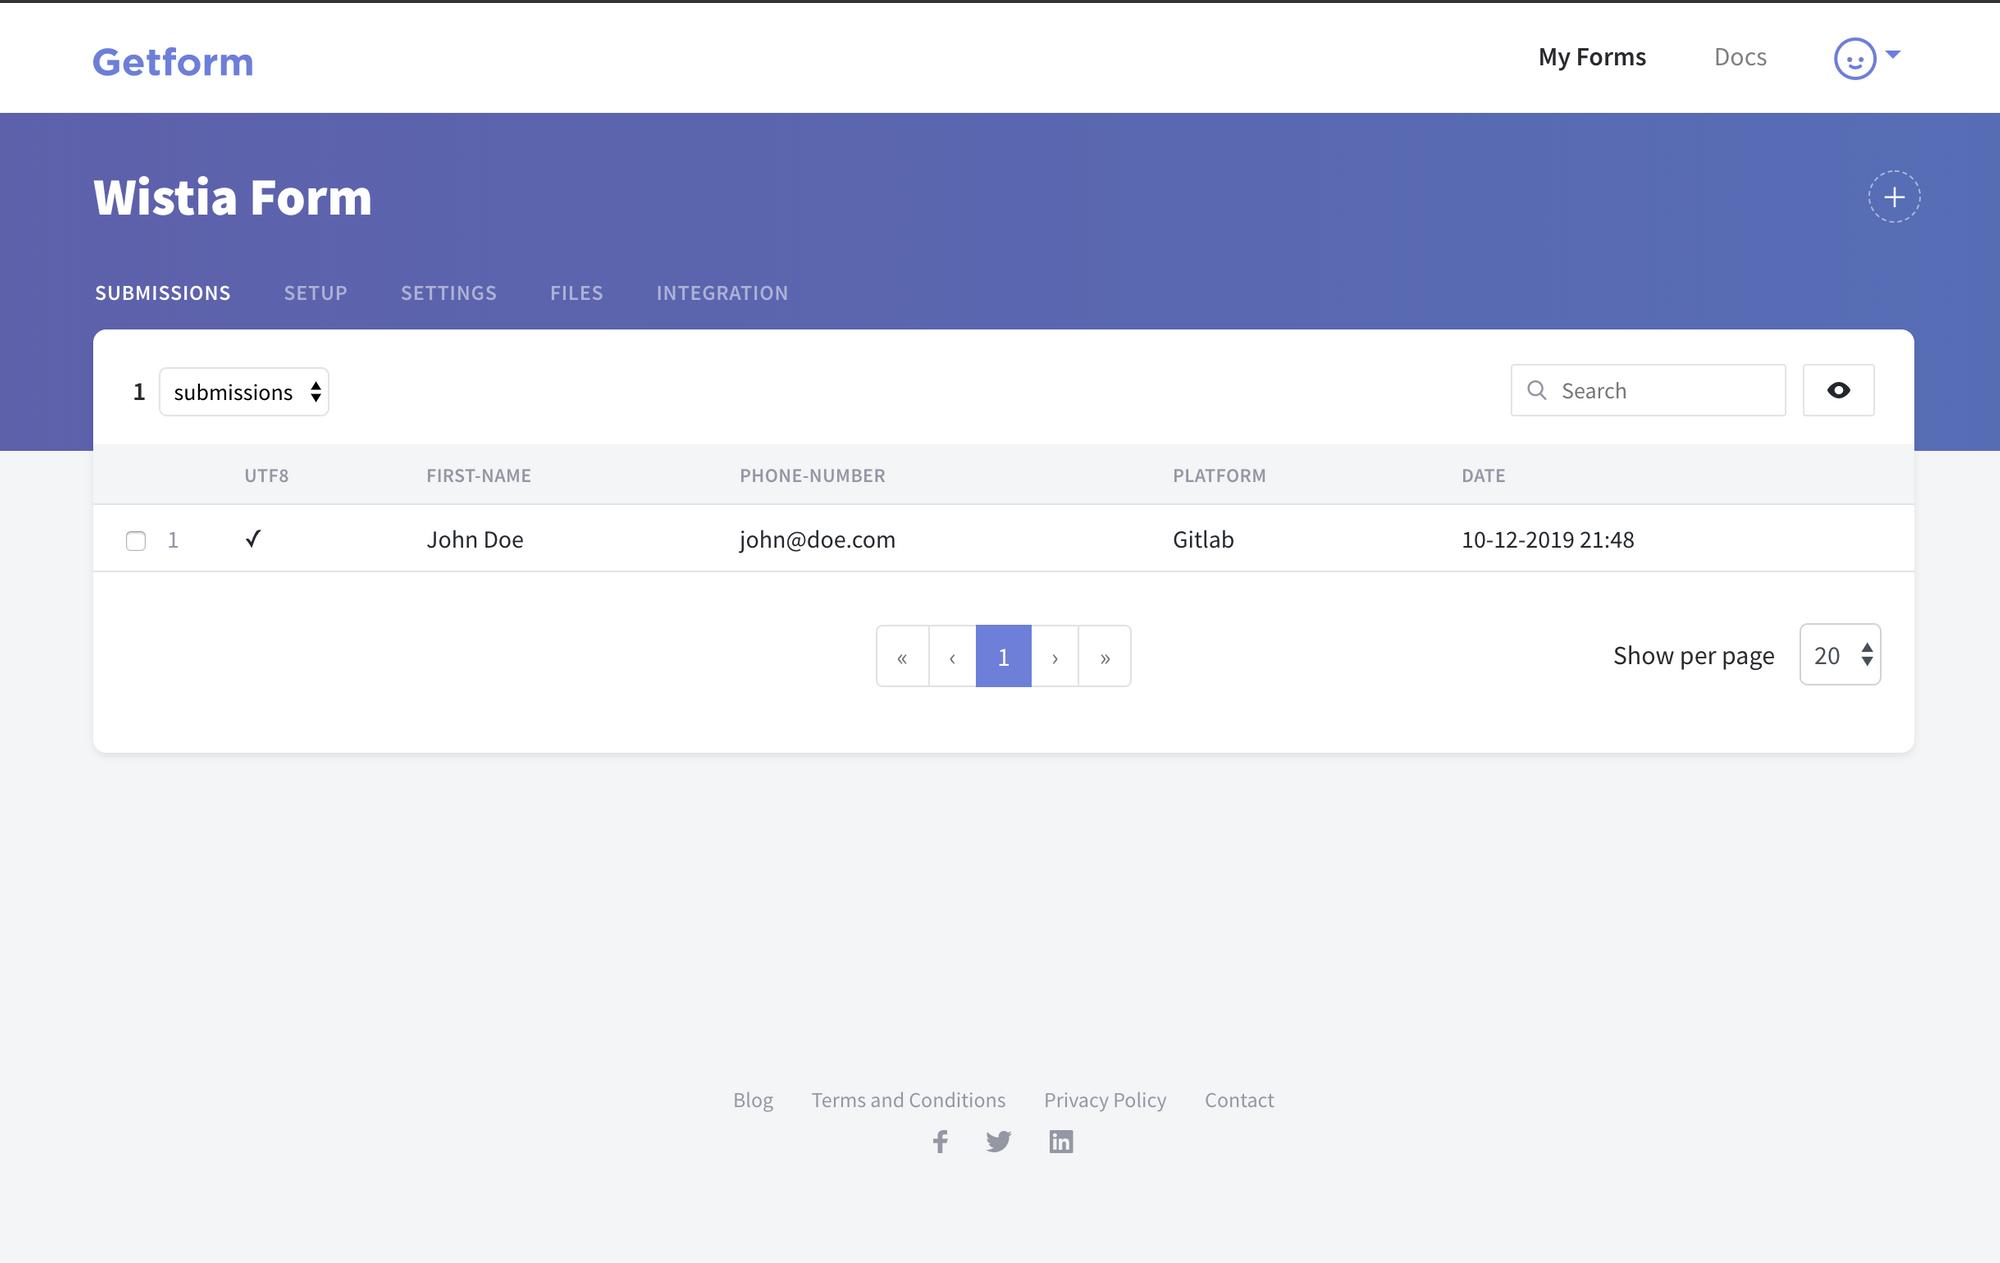
Let's submit a form and see the data appear on your Getform dashboard instantly.
- Imagine someone filled in your form like this:

- Upon successful form submission, your Getform dashboard will look like this:
5- BONUS: Set up your form to submit without refreshing or redirecting page
At this point, your form will receive the submissions and redirect your visitors to Getform's "Redirect URL" or the custom URL you have defined if you are a premium user.
But if you want your visitors to keep watching the video even after they submit a response to your form by receiving the submissions in the background, here's what you need to do:
- Click "Embed&Share" button, you will see a screen like this:
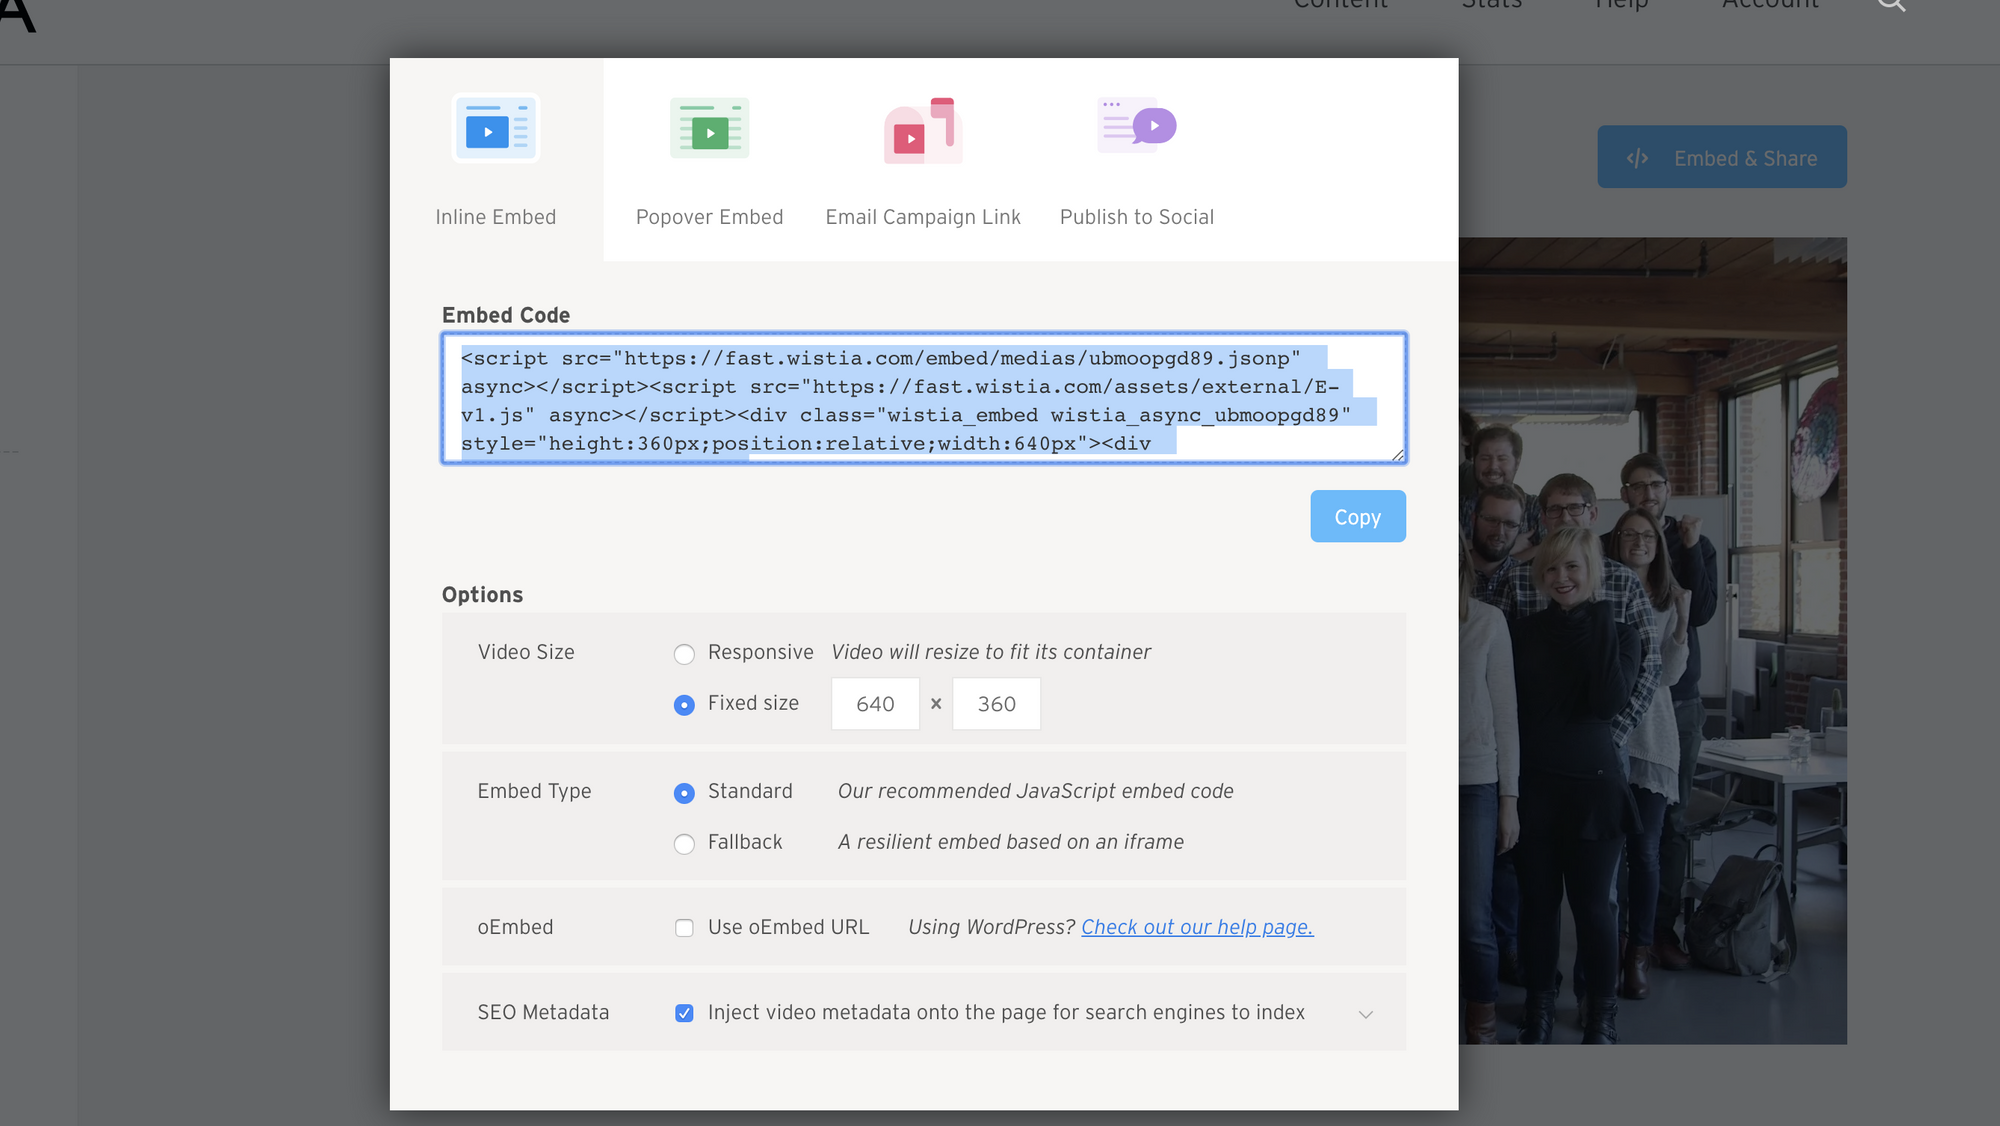
- Grab the embed code and click "Copy", add the Getform plugin script as shown in the row below.
<script src="https://getform.io/plugins/wistia.js"></script>
<script src="https://fast.wistia.com/embed/medias/#######.jsonp" async></script>
<script src="https://fast.wistia.com/assets/external/E-v1.js" async></script>
The row that contains jsonp script should be your Wistia video embed ID instead of #######.jsonp! Don't worry, it will be auto generated for you once you grab the Wistia embed code.
After you finish setting things up, you can also set up an email notification from form settings, use our Zapier integration to send your form submission data to 1000s of other applications and keep your form submissions spam protected by using reCaptcha integration.
Ready to start?
Get started by creating your Getform form now!
Create your formThank you for reading it! We keep enhancing Getform by listening to you, leave us your feature requests at https://getform.nolt.io or vote on the existing ones.
Checkout our Codepen page, Github page and Documentation for more information and samples.
Need help?
Just drop us a line at info@getform.io and we'll help you out.
Mertcan from Getform
Form backend platform for designers and developers