GatsbyJS is a a React-based progressive web-app framework that uses GraphQL to store and access content from any data source and includes static site generation. It takes the good parts of React, webpack, react-router and GraphQL and helps developers build blazing-fast websites and apps.
You code and develop your site, Gatsby transforms it into a directory with a single HTML file and your static assets. This folder is uploaded to your favorite hosting provider, and you're good to go.
In this post, we will explain you how to build a Gatsby contact form using Getform. If you don’t have any Gatsby website or no idea how to get started, you can check out the GatsbyJS quickstart here.
How to make a Gatsby contact form and handle your form backend using Getform
1- Create a Getform account
First step is to sign up to Getform if you haven’t done it already. It is dead easy and free to get started. You don’t need to provide any credit card info to get started.
2- Create a new form on Getform
After you log in to your Getform account, click to “+” button on your dashboard to create a new form, then name it e.g. “Contact Form for Gatsby Blog” and save. With that form created, your unique form endpoint is now ready to be inserted to your Gatsby form.
3- Prepare your Gatsby contact form for your website
You can use the boilerplate code provided on Getform to create your HTML form. It is a basic contact form with email address, name and favorite platform fields:
4- Getting Started with GatsbyJS
Make sure you have the Gatsby CLI installed:
$ npm install -g gatsby-cli
Create a new site
$ gatsby new gatsby-site
Change directories into site folder
$ gatsby develop
Gatsby will start a hot-reloading development environment accessible by default at localhost:8000 which will look like as follows:

5- Add a contact page to your Gatsby site
Now, we have our gatsby site running and ready to create our contact page.
- Create a new file called contact.js under src/pages directory.
- Change its content with the following code block, the contact form itself will be html, which will work fine :
import React, { useState }  from "react"
import axios from "axios";
import { Link } from "gatsby"
import Layout from "../components/layout"


const MyForm = () => {

    const [serverState, setServerState] = useState({
      submitting: false,
      status: null
    });
    const handleServerResponse = (ok, msg, form) => {
      setServerState({
        submitting: false,
        status: { ok, msg }
      });
      if (ok) {
        form.reset();
      }
    };
    const handleOnSubmit = e => {
      e.preventDefault();
      const form = e.target;
      setServerState({ submitting: true });
      axios({
        method: "post",
        url: "https://getform.io/f/4113f349-e99f-495a-b529-18c2cb40e11c",
        data: new FormData(form)
      })
        .then(r => {
          handleServerResponse(true, "Thanks!", form);
        })
        .catch(r => {
          handleServerResponse(false, r.response.data.error, form);
        });
    };
    return (
        <Layout>

    <div>
         <div className="col-md-8 mt-5">
            <h3>Getform.io Gatsby Form Example</h3>
            <form onSubmit={handleOnSubmit}>
            <div className="form-group">
                <label for="exampleInputEmail1" required="required">Email address</label>
                <input type="email" name="email" className="form-control" id="exampleInputEmail1" aria-describedby="emailHelp" placeholder="Enter email"/>
            </div>
            <div className="form-group">
                <label for="exampleInputName">Name</label>
                <input type="text" name="name" className="form-control" id="exampleInputName" placeholder="Enter your name" required="required"/>
            </div>
            <div className="form-group">
                <label for="exampleFormControlSelect1">Favourite Platform</label>
                <select className="form-control" id="exampleFormControlSelect1" name="platform" required="required">
                <option>Github</option>
                <option>Gitlab</option>
                <option>Bitbucket</option>
                </select>
            </div>
            <button type="submit" className="btn btn-primary"  disabled={serverState.submitting}>
                Submit
            </button>
            {serverState.status && (
                <p className={!serverState.status.ok ? "errorMsg" : ""}>
                {serverState.status.msg}
                </p>
            )}
            </form>
        </div>
      </div>

  </Layout>

    );
  };

  export default MyForm;
- Don’t forget to change the
actionpart of your<form>tag in your contact.js file, update it with the form endpoint URL you copied in step 2.
Sample form endpoint: https://getform.io/{YOUR_UNIQUE_FORM_ENDPOINT}
- We pass the full form data as an object to Axios. Axios will convert this into a
multipart/form-dataobject before submitting and Getform understands this payload. - We enable bootstrap by installing it using package managers, npm or yarn:
with npm-npm install react-bootstrap bootsrap
with yarn -yarn add bootstrap
and import it to layout.js under src/components/layout by adding the following code:
import 'bootstrap/dist/css/bootstrap.min.css';
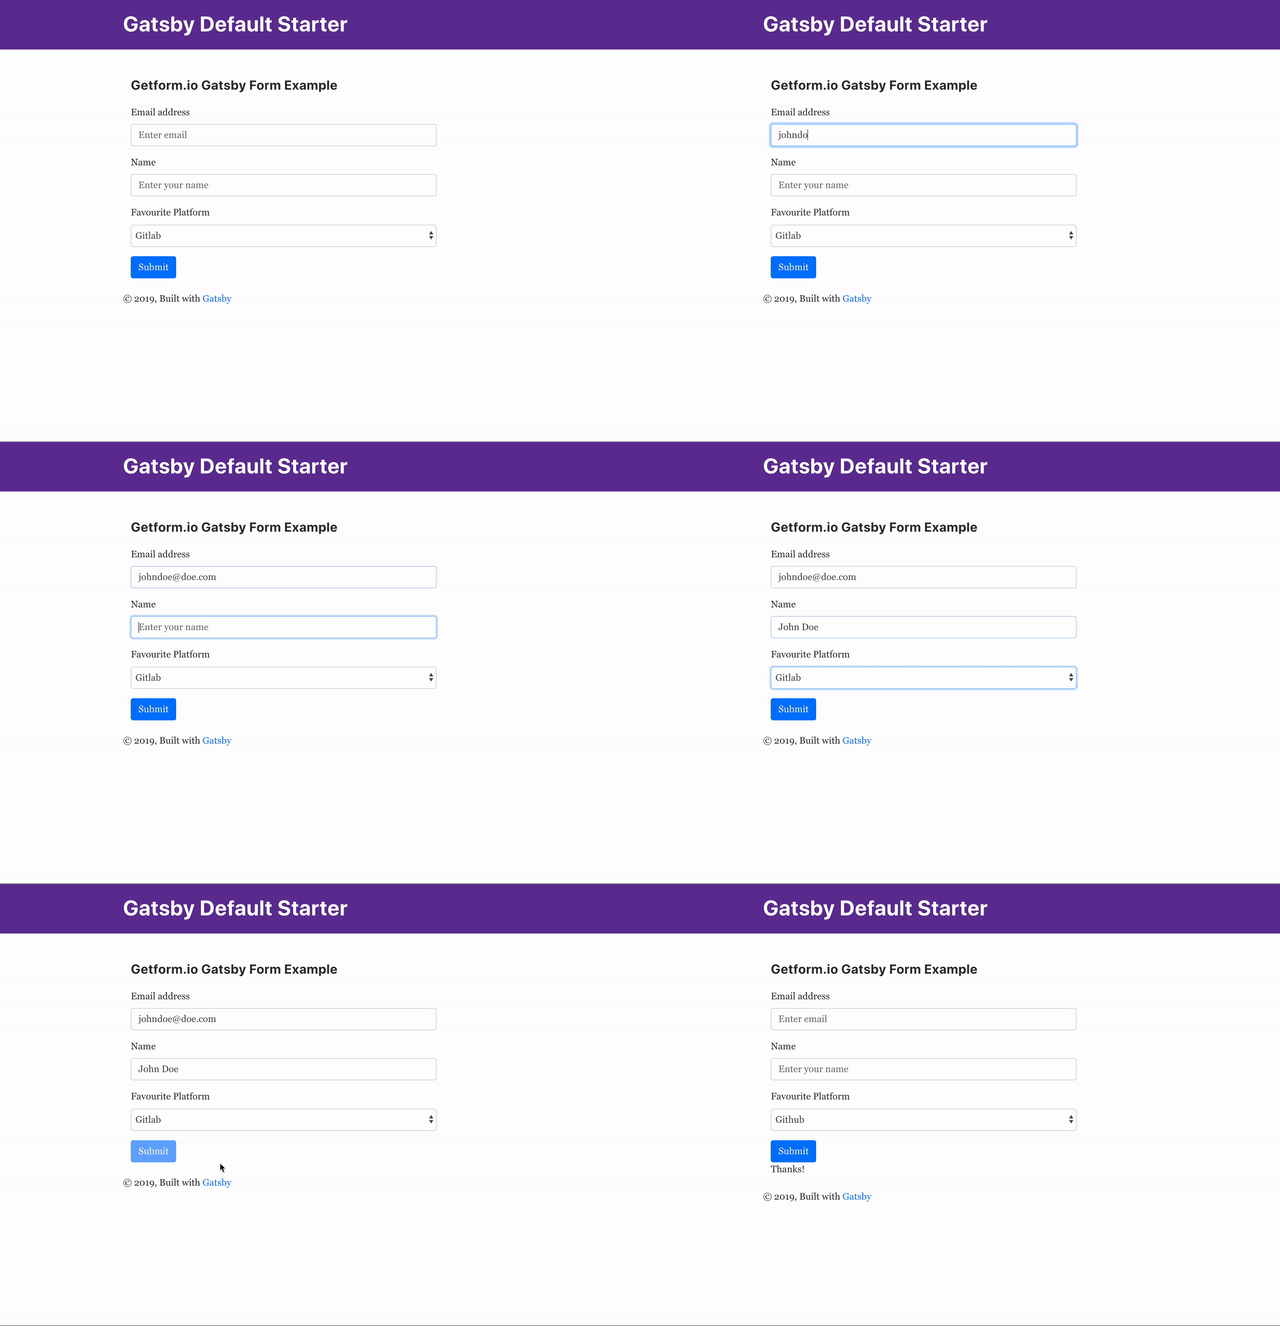
- run gatsby develop and go to localhost:8000/contact/. Here is how your contact page looks like:

6- Test your form on your Gatsby site by submitting a sample form submission!

That’s it! Your Gatsby site is now using Getform backed form backend.
After you finish setting things up, you can also set up an email notification from form settings, use the Zapier integration to send your form submission data to 1000s of other applications and keep your form submissions spam protected by using reCaptcha integration.
7- BONUS: Deploy your Gatsby contact form using ZEIT Deploy button
You can find the source code of this tutorial here. Optionally, you can use this boilerplate code to get started and even deploy this sample to a working website within couple of minutes using ZEIT . As you might see under the README section of the sample tutorial code, there is a Deploy button like this:
When you head over to the link, you will be asked whether you want to create a git repository from this sample or not. Make your selection and click "Deploy" button to deploy this sample repo with ZEIT's Now.
Here is the deployed website link of the sample: https://gatsby-getform-example.now.sh/
Thank you for reading it! We keep enhancing Getform by listening to you, leave us your feature requests at https://getform.nolt.io or vote on the existing ones.
Checkout our Codepen page, Codesandbox page, Code Zapier page and Documentation for more information and guides.
If you would like help setting up Getform to Gatsby site, feel free reach us out at info@getform.io
Mertcan from Getform
Form backend platform for designers and developers

